
Introduction


This is a how-to for building a grid spot for a flashlight with
- marginal effort
- maximum speed
- good stability.
First of all, the required material is:
- Black straw (bar accessory)
- Tape (any will do; I prefer Masking Tape)
- Cardboard (like from a tear-off notebook)
And scissors. And, well, a flash (also known as speedlight (Nikon) or speedlite (Canon)).
All tutorials about grid spots I’ve seen so far use glue. But tape is much faster (no drying time) and easily reversible; especially when using masking tape.
So the first thing to do is to determine the length of the straw, as this affects the size of the spot. In this example I’m using 8 mm straw and cut it to 2.5 cm (one inch) pieces which is exactly the width of the tape. For narrow spots it is very helpful to have straw with low diameter, like 3 mm, to keep the grid short.
The form below calculates the parameters (you can change any of them).
Assembly

The length now being determined, next step is to cut the straw and assemble it. Assembling works easiest as shown in the pictures on the right: Stick a tape strip of about twice the length of the flash’s width on your table such that the adhering part faces upwards, and stick the first straw piece onto it. (Take care that it is not skew.)

The next pieces follow until the band has the same size as the head of the flashlight.

Since cutting each piece separately is a little bit cumbersome, I prefer to use a shortcut: First stick all straws to the tape, and then cut them to the right length all at once.

When the desired width is reached wrap the rest of the tape around to stabilize the first grid row.

The next step is basically just repeating the previous steps …

… with the difference that the rest of the tape is wrapped around the last row(s) that have already been assembled. Repeat until the height of the grid matches the flashlight’s head.

Now our grid is basically already ready to use, yet a little unstable (especially for straw with large diameter like here; 3 or 5 mm straw is much more stable). The cardboard will solve this problem. Four pieces, one for each side. Cut them 2 or 3 millimeters shorter than the actual width of the grid, this allows to stick it more tightly.

I use to cut the cardboard strips just as wide as the tape, no matter how long the grid is (at most 5 cm (2″) anyway). Then stick it on a tape stripe and everything together on the grid.

That is what the grid finally looks like.

For mounting the grid on the speedlight Masking Tape is again our friend as it can be removed again cleanly. No need to glue velcro on your flashlight.

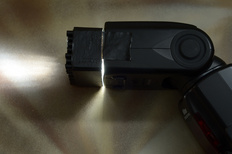
When not used, the tape can simply be sticked over the grid. And when used it looks as shown in the first picture on this page.

On the right a comparisation of a blank flashlight (SB-900 at 200 mm, on the right) and the new grids. (I had to use the ceiling, being the only free place.)
Note how the grid delivers a perfectly round spot. This is because the straw is round. Square straw would result in a square spot.
The grid at the bottom is 5 cm long, with 3 mm straw. The one on the lamp is the one built in this tutorial.

-
- Painted black.

Final notes:
- I use to mark the grids with the spot size after one meter. To make selecting the appropriate one easier. I cannot go for the length – the 240 grid is shorter but delivers a narrower spot than the longer 330 grid.
- Color gels can be put between grid and flashlight and directly fixed with the tape. No traces left behind when using Masking Tape (it is really great!).
- Feel free to paint your grid black to make it look more professional.
(I’m too lazy for it.)Painting it black works very comfortable with black spray paint (preferredly matte paint, like mtn 94 for example) since also hardly accessible patches get covered.
Have fun!

Links and more
- strobist.com – The page about flashlights.
- lightningmods.blogspot.com about using Grids
- Shop selling black straws in Switzerland
- Rosco Color Gels: Strobist collection; Shop selling in Europe
- ^ Spot enlargement: This number means how much wider the light cone becomes after each meter.